Overview
In this tutorial, you will learn what a view is and how to use T-SQL to work with views. We will also discuss some common reasons for creating views and some advantages and disadvantages associated with views. Later, we will learn how to restrict certain data from specific users by setting limitations on the view. Next, we will learn how to create a view that extracts data from multiple tables. Finally, we will learn how to alter and drop views.
A couple points of interest regarding views:
- Views can prevent erroneous manipulation of data in tables by an unsuspecting user.
- Views can also limit how much information a user can access from one or more base tables.
You can often get similar results by creating a stored procedure or CTE, but this tutorial will focus on Views.
What is a SQL VIEW?
A SQL VIEW is a virtual table that is built with a SELECT statement. A view can reference a single table or multiple tables. Views contain rows and columns much like a table. A view can also contain most SQL statements and functions and resemble a table; however, its contents do not exist until you call the view. So, what does that mean? Think of a view as simply that, it's a "view into" or snapshot of some or all of the data in a table.
As we will learn in this tutorial, a view can return (show) data in rows and columns from a single table or multiple tables. This allows you to select, for example, the first and last name from one table and the corresponding department name from another table to display the combined results in a view.
What a VIEW is not
A view is not a table, although it looks and acts like one. A view does not contain data, it's merely a portal to existing data in underlying tables. As mentioned earlier, it allows you to "peek" to see the data in one or more tables. For the most part, it functions as a table, but with some limitations that are not present in a table. More on this in the "Limitations of a VIEW" section below.
Creating a SQL VIEW
Why create views in SQL if a view is like a table, but with limitations? Why not just use a table and avoid the hassle of creating a view? There are several good reasons for creating views and not relying on tables alone. A couple of the most prominent answers are security and diverse results. Often, these two reasons work hand in hand. For example, if you needed to get some information from one table and at the same time retrieve additional information from another table that has corresponding data. Creating a view from the two tables will allow you to provide more information to the person querying the view but at the same time limiting what they can see from each table.
For example, your view could return the first and last name of an employee from an employee table and the department name they are associated with from the employee department table, but not returning the employee phone number or email address form the employee table, since that would be considered sensitive information. Now that we have a basic understanding of what a view is used for, let's delve into the process of creating a simple view using T-SQL.
Basic Syntax for Creating a View in SQL
CREATE VIEW view_name AS
SELECT column1, column2, ... View columns
FROM table_name;
The CREATE VIEW statement in SQL allows us to use a SELECT statement to define the parameters of our view. In its simplest form, a view is simply a SELECT statement preceded by the "CREATE VIEW AS" statement as the VIEW definition.
A SELECT statement to query a table (or tables) can, in most cases, be converted into a view. This allows you to query the view instead of writing the SELECT statement each time you need to reference the data in one or more tables.
In the sample code above, we are using a SELECT statement to return column1 and column2 from a table. We can also set some conditions like: within a date range, or an age group, etc. Now, let's look at some basic rules for naming a view.
VIEW Naming conventions
VIEW names should follow the same basic guidelines as table names.
- The names must be less than 128 characters.
- Names cannot contain spaces.
- Names cannot start with a number.
- Names cannot start with most of the special characters such as: @, $, %, etc.
- Names may contain upper-case and lower-case letters.
- Names should be descriptive and should have some indication that it is a view and not a table.
- Names should not be named with reserved keywords or data types.
- You can have names with a space, but the name must be surrounded by [], but this is NOT a recommended practice
- This is a preferred naming convention.
- Two of the most popular naming conventions are camel case and pascal.
- An example would be, vEmployee, indicating that it's a view of the employee table, or at least parts of the table.
With that said, let's jump in and create a simple view using the Adventureworks2022 database. You can download a copy from here:
AdventureWorks2022
However, you should have covered this process in Step 3 of this website. If not, go back to Step 3 and download/install the sample database before you continue.
Using T-SQL to Create a Simple View
In this section, we will create a simple view on the Person.Person table in the Adventureworks2022 sample database.
In a basic query of the Person.Person table, you will notice there are 13 columns in the table, we only want three columns in our view: first name, last name, and email promotion. Below is a sample of what the SELECT statement would look like.
USE AdventureWorks2022;
GO
SELECT
    FirstName
  , LastName
  , EmailPromotion
FROM Person.Person;
GO
Now, let's create a simple view to query instead of writing this SELECT statement over and over each time we need to look at this data.
CREATE VIEW vEmployeeNames
AS
SELECT
    FirstName
    , LastName
    , EmailPromotion
FROM Person.Person;
GO
Notice the only difference between the two code blocks above is that in the second code block, we added the "CREATE VIEW vEmployeeNames AS" line of code at the top. This is followed by our original SELECT statement.
Now, instead of writing this SQL query every time we need to call this information, we simply query the view to get the same results as we did from our original SELECT statement.
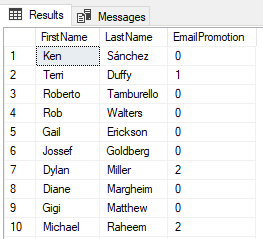
SELECT *
FROM vEmployeeNames;
GO
Results: (Partial)
Using T-SQL to Create a View of Multiple Tables
Returning specific columns from a table with a simple view is just one option for generating views. Perhaps we need to pull the data from specific columns in one table and related data from certain columns in another table. We can do this by using a JOIN statement in our query.
I won't delve too far into what a JOIN is in this article. Suffice to say that this function works just as it states: it allows the user to "join" two or more tables in a single query. You can read more about the SQL JOIN function in this article Getting Started with SQL INNER JOIN.
In this section of the tutorial, we will be joining two tables found in the AdventureWorks2014 sample database, the Person.Person table and the Person.EmailAddress table.
We are going to retrieve the First Name and Last Name from the Person.Person table and join that information with the Email Address in the Person.EmailAddress table. The benefit of doing this will allow, for example, a manager to find the email address of a certain employee. Let's start with creating the query to do this.
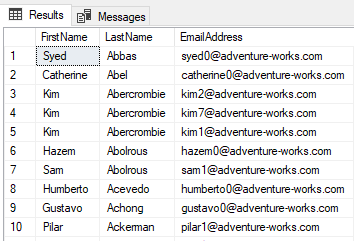
USE AdventureWorks2022;
GO
SELECT
    p.FirstName
    , p.LastName
    , e.EmailAddress
FROM Person.Person AS p
INNER JOIN Person.EmailAddress As e ON p.BusinessEntityID = e.BusinessEntityID;
GO
Before we get too much further along, let's explain what we just did. We used an alias to distinguish between the two tables: "p" for the Person.Person table and "e" for the Person.EmailAddress table. We joined the values in the two tables based ON the BusinessEntityID that is common in both tables. If you run the query in SSMS your results should look like this partial result set.
You can probably guess where we are going with this, we are going to use this query to create a view. As we mentioned in the section above, Using T-SQL to Create a Simple View, we will add the code "CREATE VIEW vEmployeeEmail AS" line of code above the SQL query. See the sample code in the following example below.
USE AdventureWorks2022;
GO
VIEW vEmployeeEmail
AS
SELECT
    p.FirstName
    , p.LastName
    , e.EmailAddress
FROM Person.Person AS p
INNER JOIN Person.EmailAddress As e ON p.BusinessEntityID = e.BusinessEntityID;
GO
That's it. Congratulations on creating your first multi-table view. You can join as many tables as you like by simply adding the appropriate tables with aliases and adding more "INNER JOIN ON" lines for each table. The following snapshot shows how adding five tables would look when stacking multiple INNER JOIN statements.
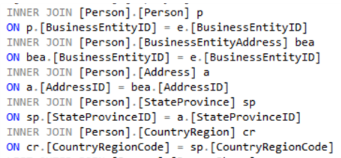
Notice that it's simply a repetition of the INNER JOIN statement.
Advantages of a VIEW
Why do we need views?
There are a few reasons that are most prominent.
- Views can reduce the redundancy of writing a specific SQL query every time we need to view certain columns on underlying tables.
- Views allow us to pull certain columns from different tables by grouping the columns into a single new virtual table. What we call a VIEW.
- Views can work as a security barrier to keep data from some columns out of the view of certain employees.
As we mentioned in the previous section, we can return data from multiple tables to create a view. The advantage of doing so allows us to pull certain columns from each table to present to our viewers. It also allows for us to implement a certain level of security.
Row level security: (Limiting data with a view) in its simplest definition, we are restricting what columns, and thus what data, users will have access to. For example, if we have a table that lists an employee's name, address, phone number, social security number, etc., we may need to create a view that only lists the employees name and phone number, but not their social security number, as we did in the sample above.
Summary
Although there is more to views than what was discussed here, you can read the full article (Creating SQL VIEWs with T-SQL) that I orriginally wrote on MSSQLTips.com.
But, this will get you started with SQL views.
If you were directed to this website from one of my books "SQL Practice and Interview Questions" or "SQL From the Ground Up", you may now return to the respective book and continue your learning process.
Thank you for reading and I hope you have learned something.

